Flutter iOS
This details the steps that need to be taken once you have access to our iOS Keyboard SDK, in order to have a functional custom keyboard with onboarding sequence integrated into your Flutter app.
Before Starting
Please contact Tappa to:
Get your CampaignID, without it, you will not be able to use the framework
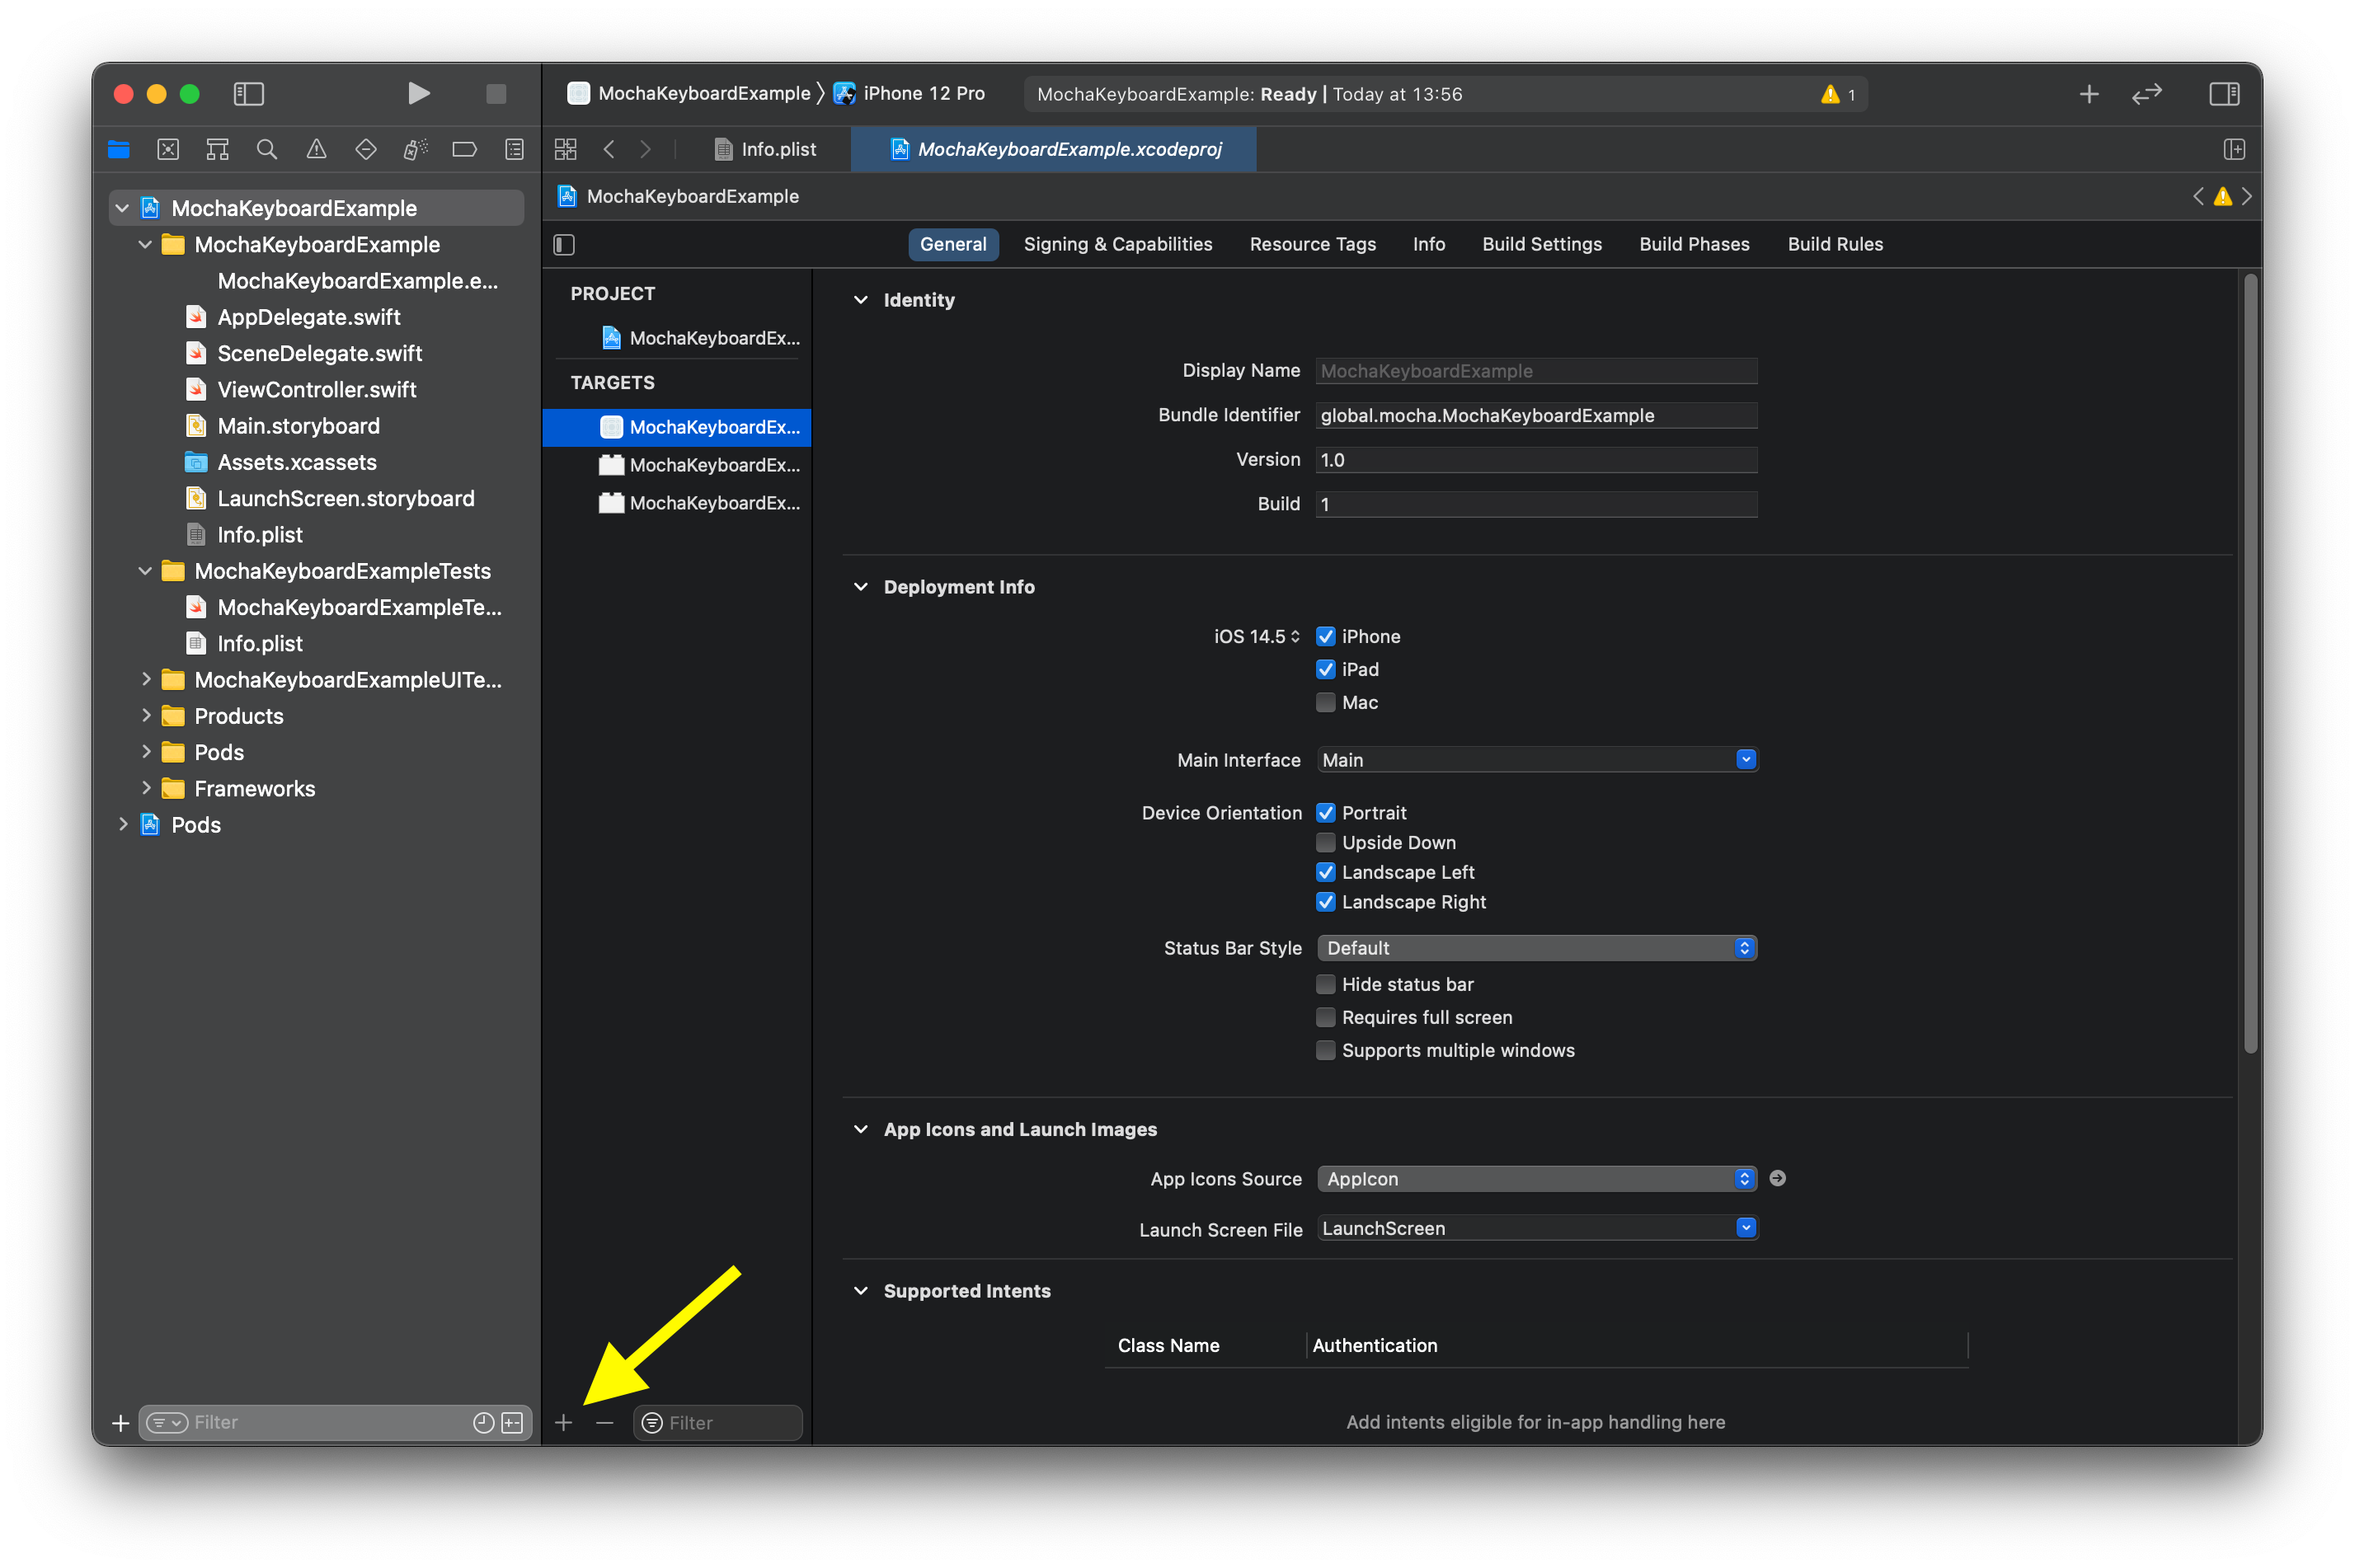
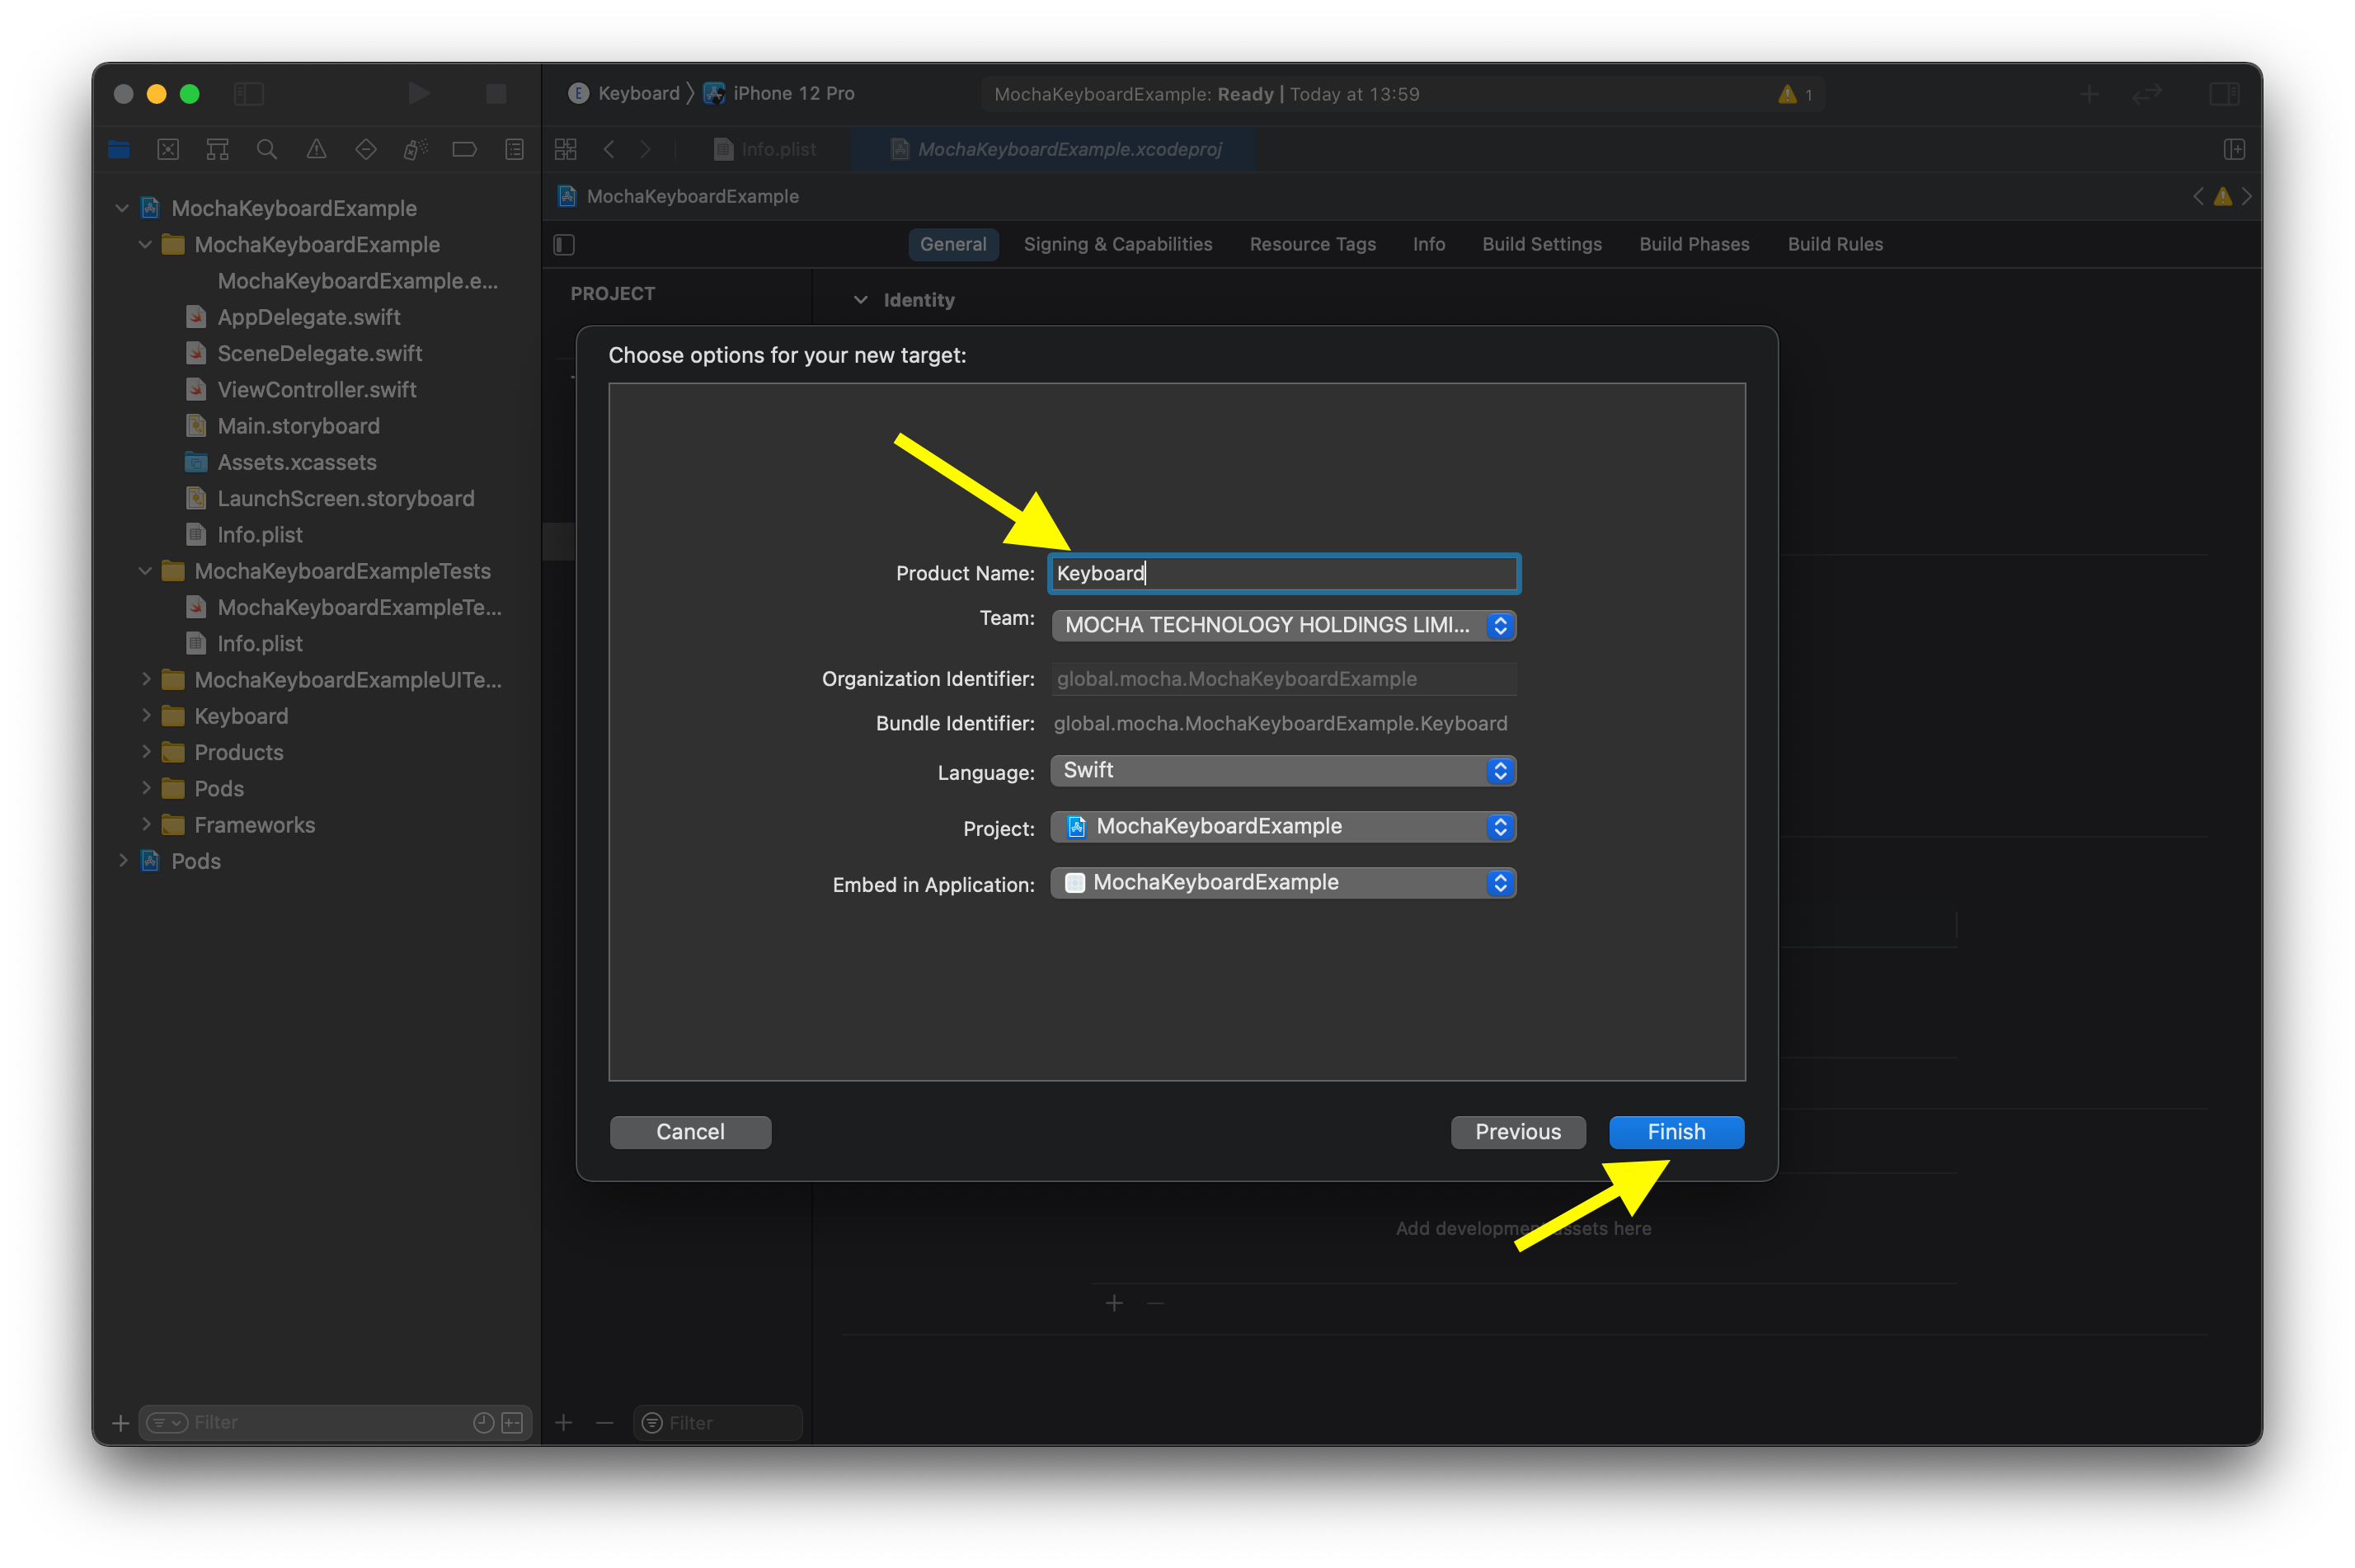
1. Adding Keyboard Target
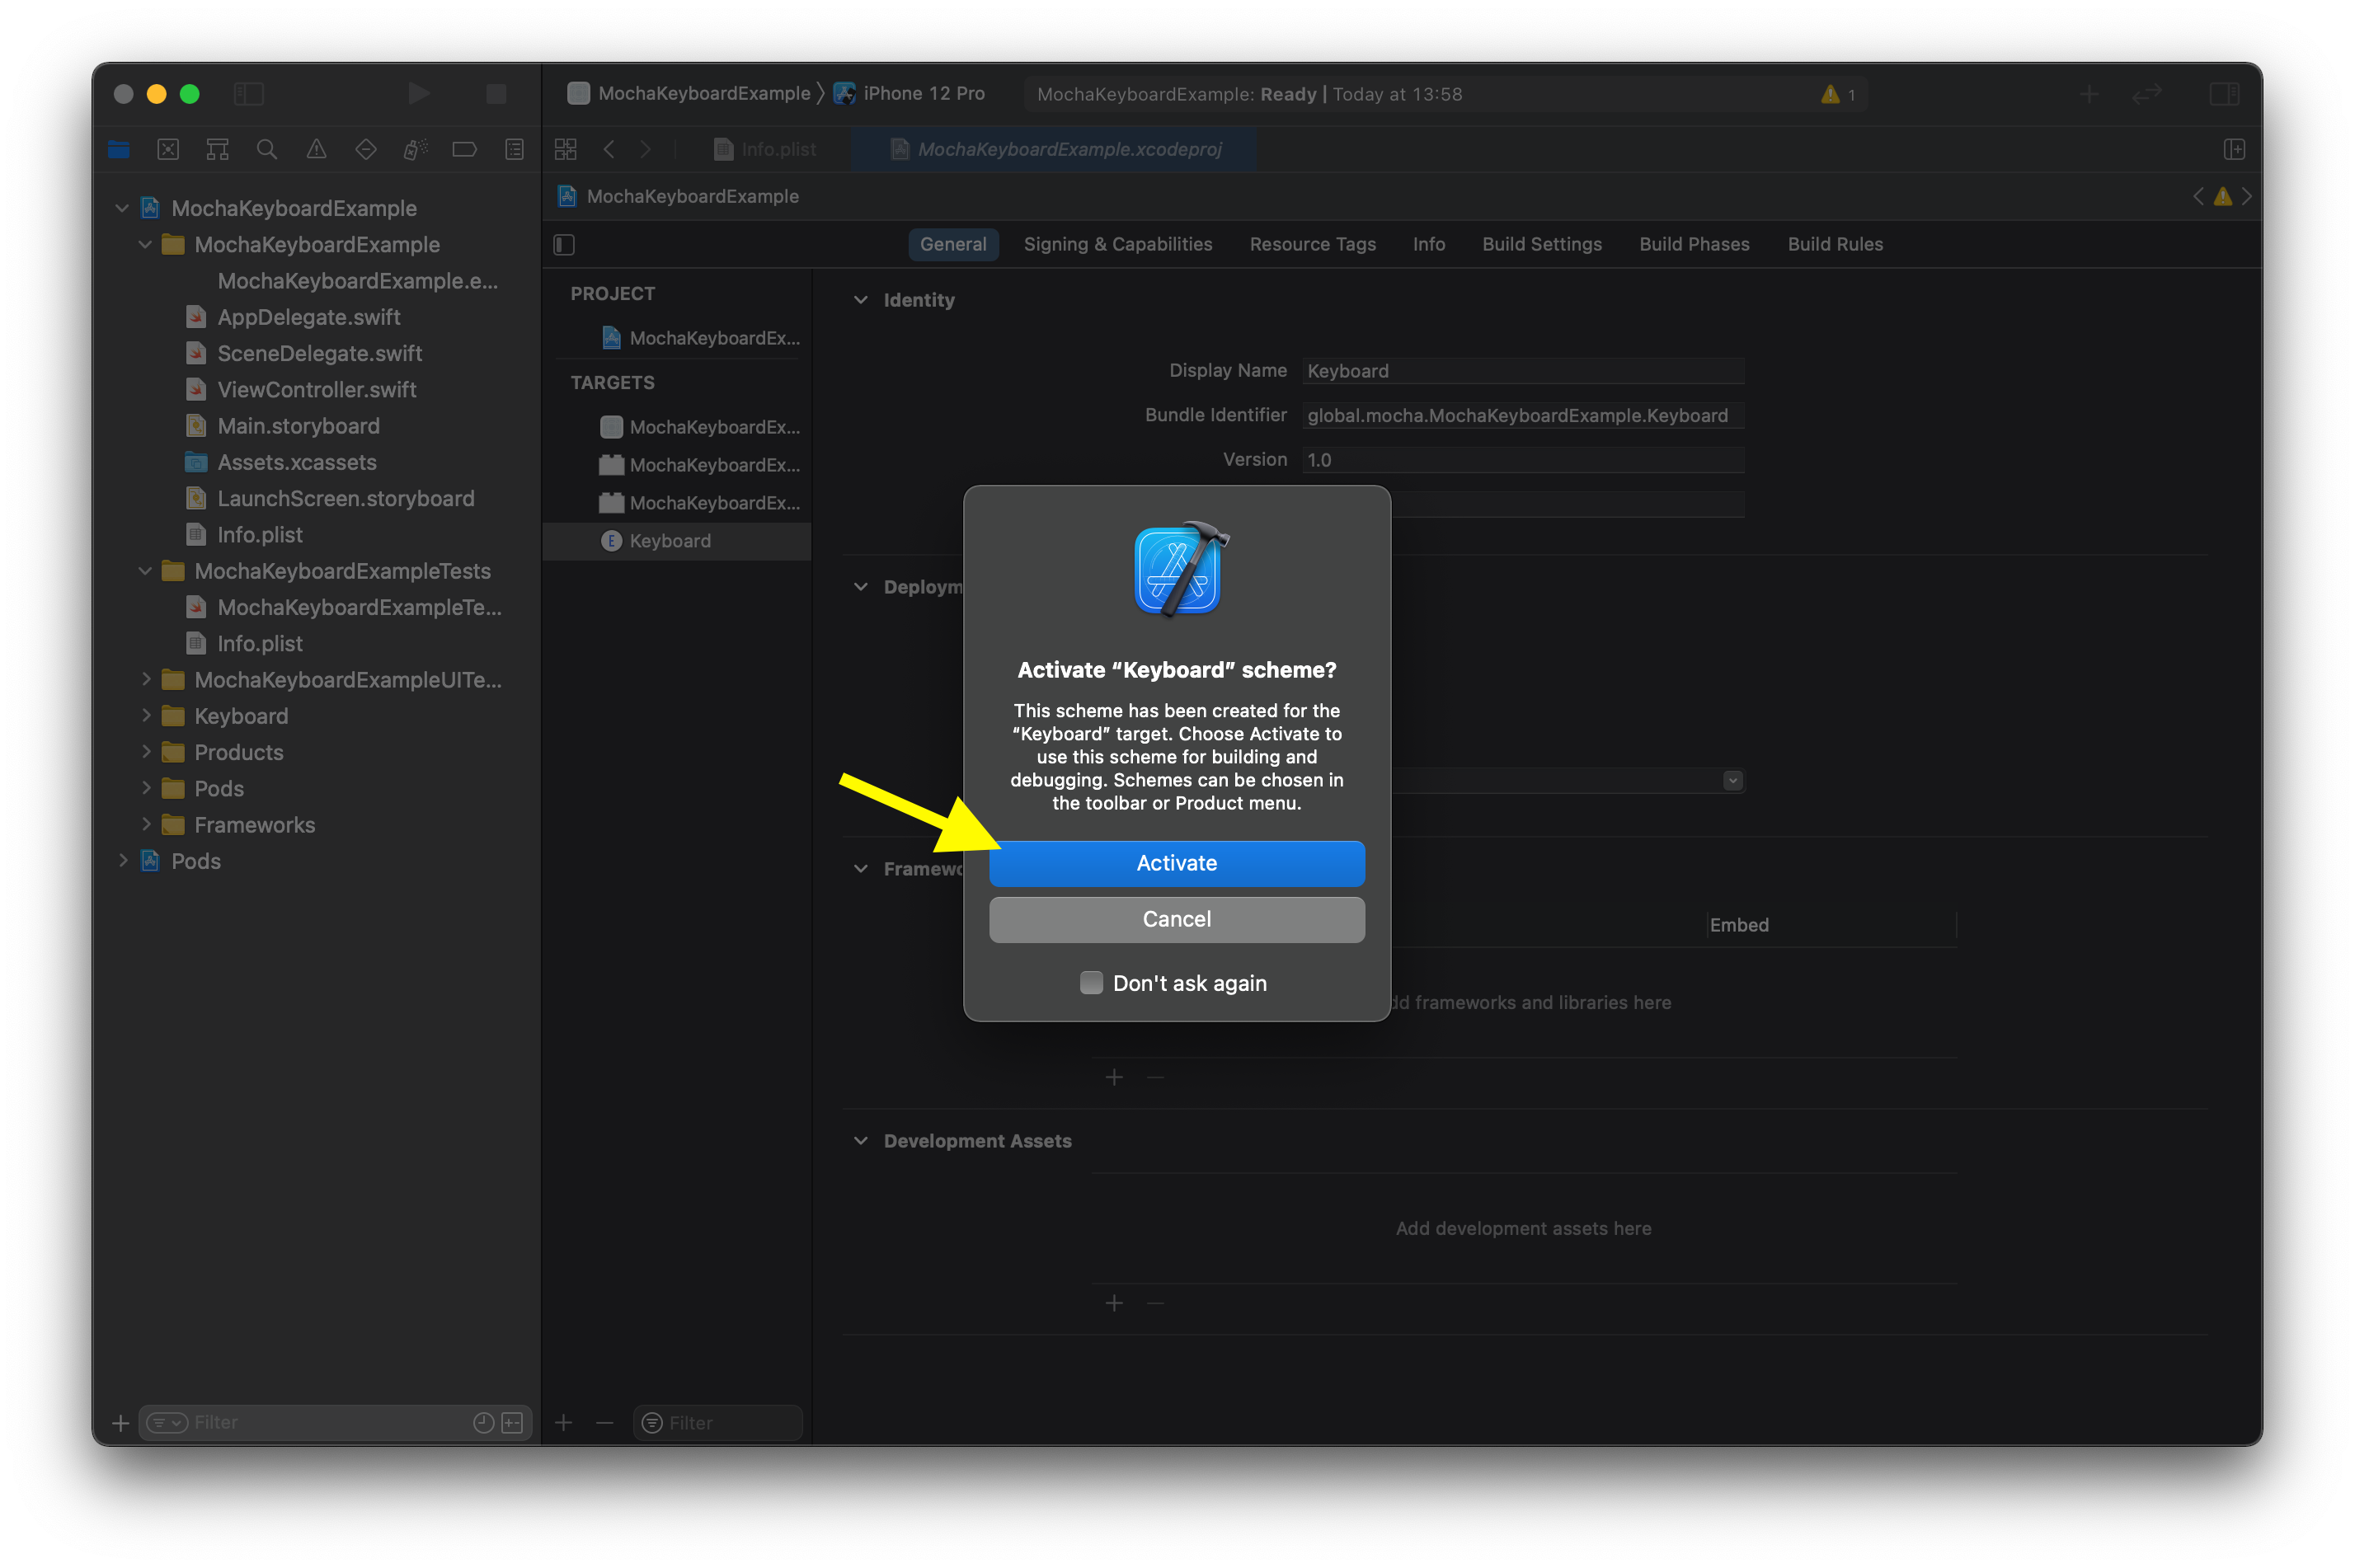
Create a new target in the Xcode project, a custom keyboard extension. Choose a meaningful name for it. Activate it when asked.
This will create a new folder in the project, with the chosen name, containing a template Info.plist file and a template KeyboardViewController.swift file.
Step 1.1: Change the bundle identifier for the extension to be <app_bundleID>.extension.
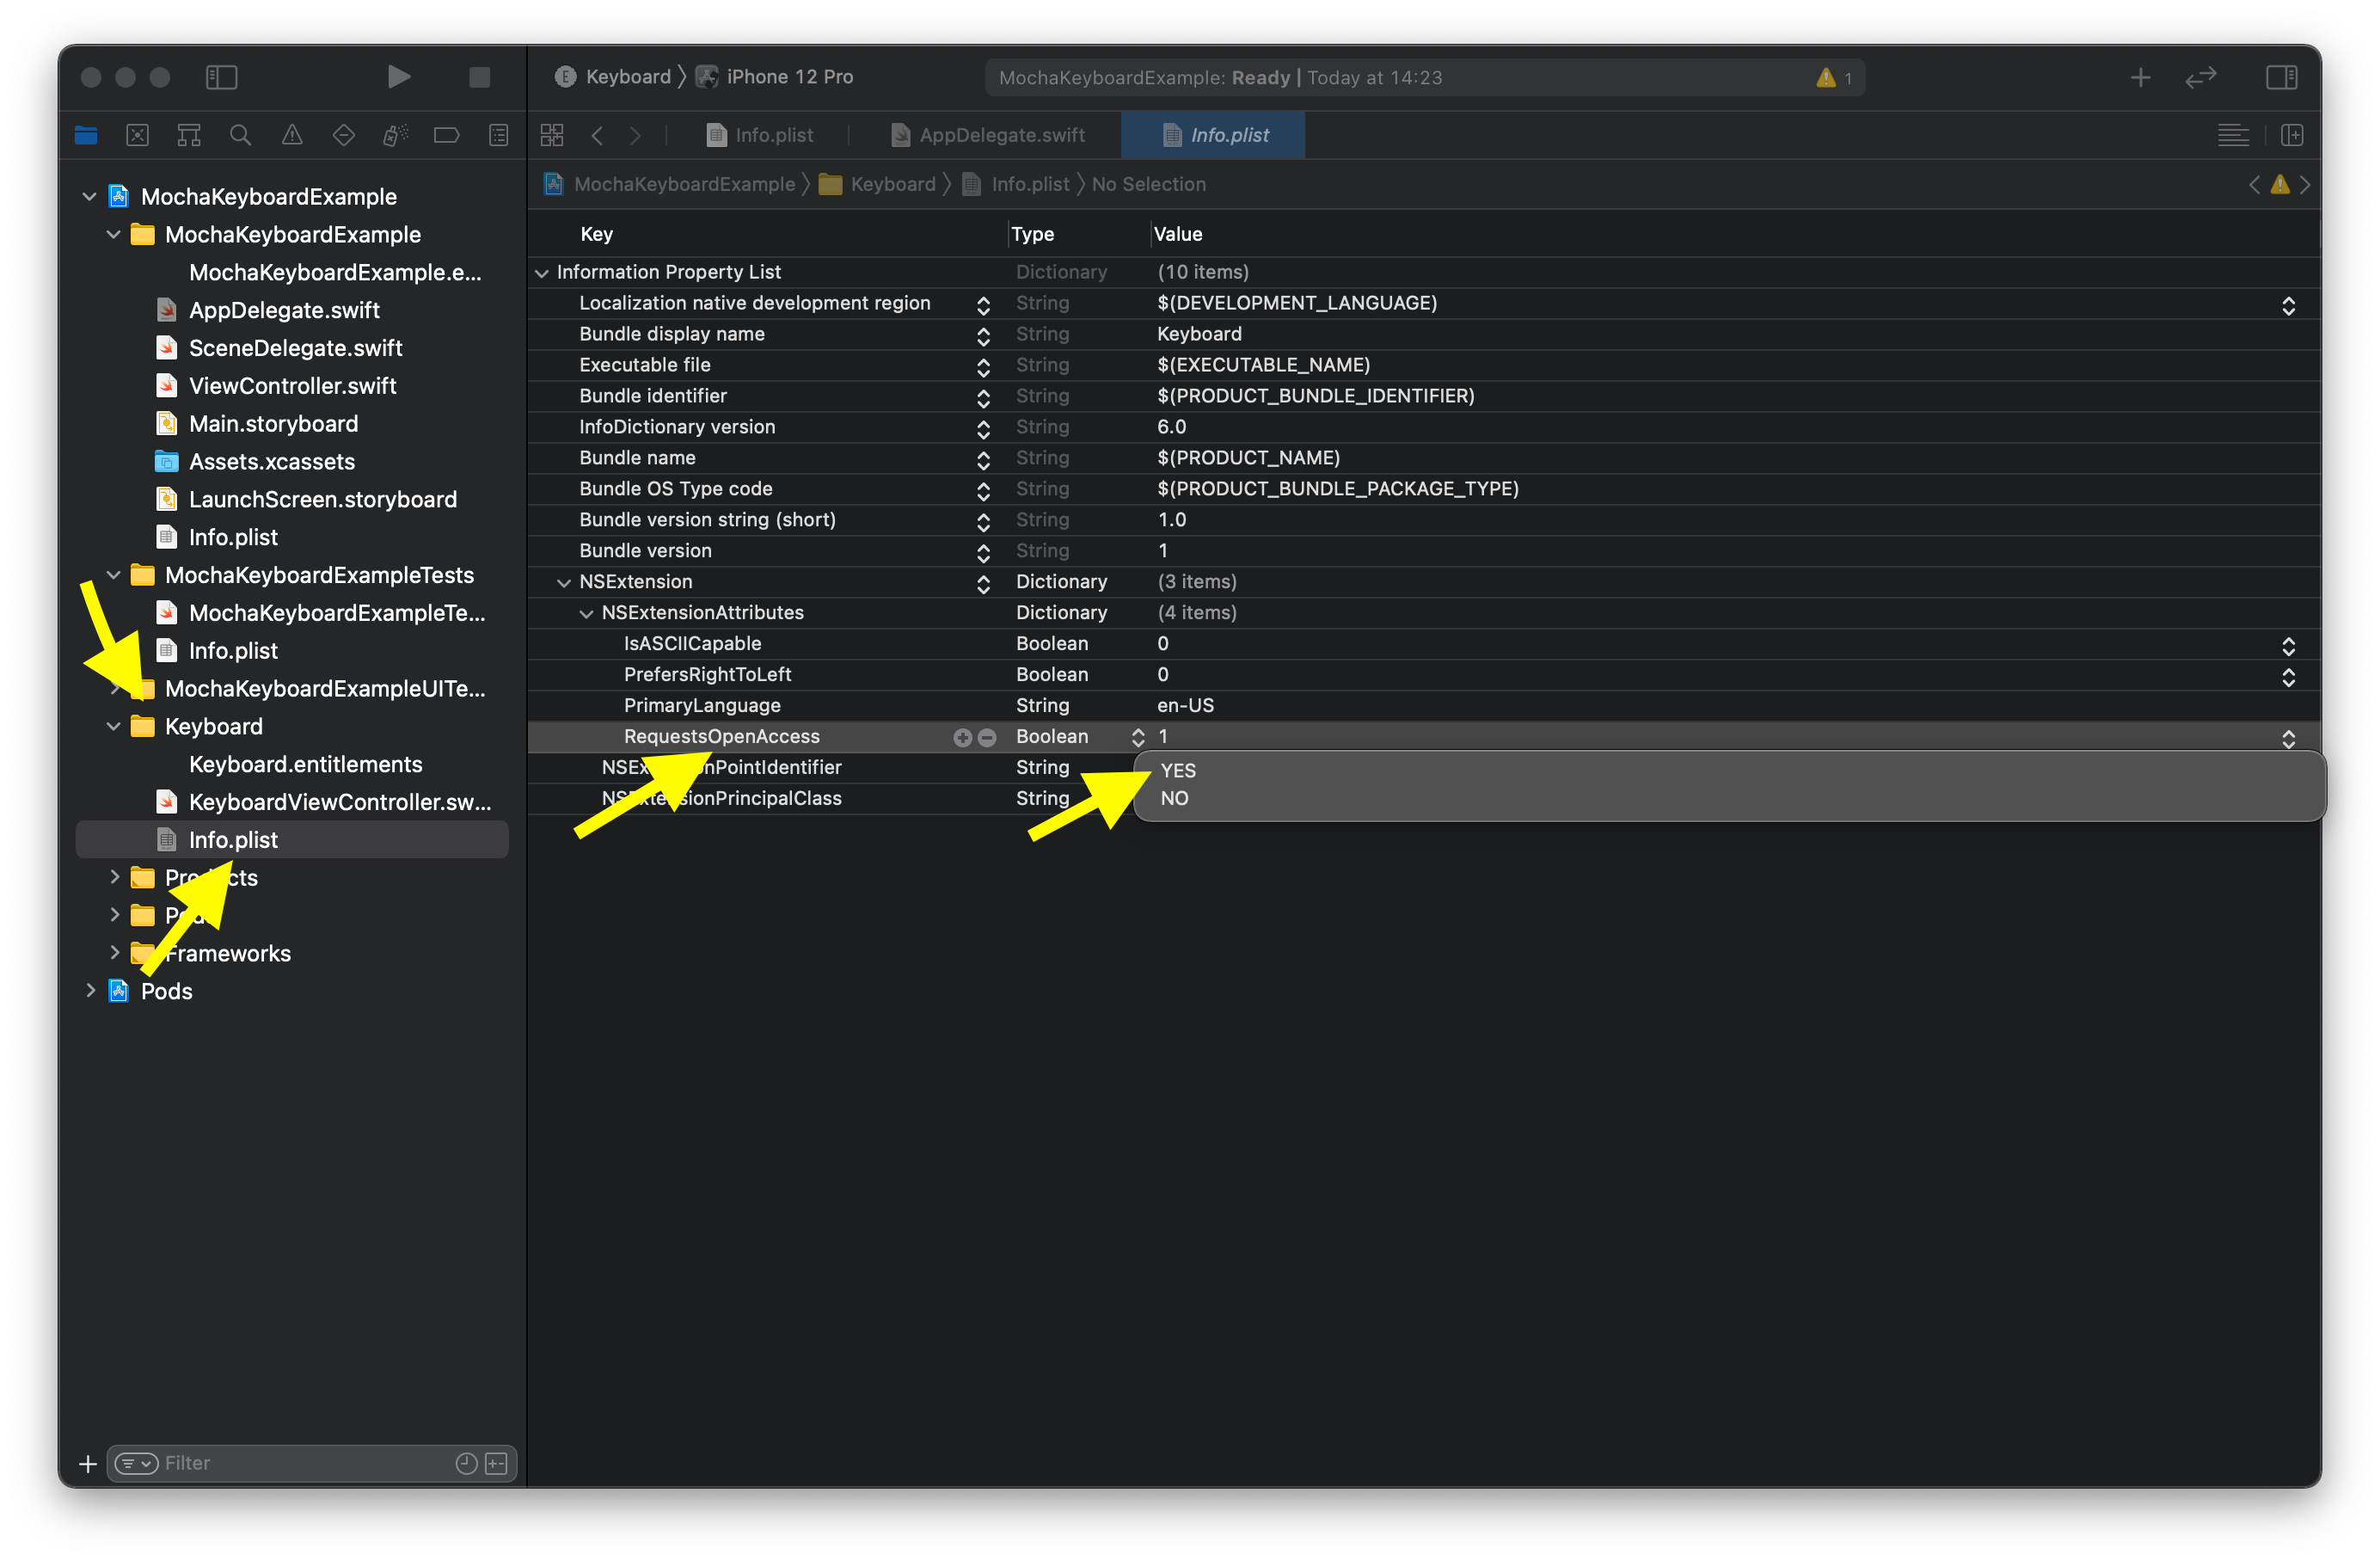
Step 1.2: Customize the Info.plist file setting RequestsOpenAccess to true.
Step 1.3: Customize the Deployment target for the keyboard extension to what you need for your project. But keep in mind that the SDK only works starting with iOS13. Also, all targets Deployment targets should match (or just set it once in the project)
Step 1.4: Install the custom keyboard on the device/simulator by activating from Settings/Keyboards or from Settings/< yourappname>. (for now)
Checkpoint: At this moment the iOS demo template keyboard should be active/selectable. It is empty screen for new devices (that have the next keyboard button in the bottom area). It only contains one button (next keyboard) for older devices.

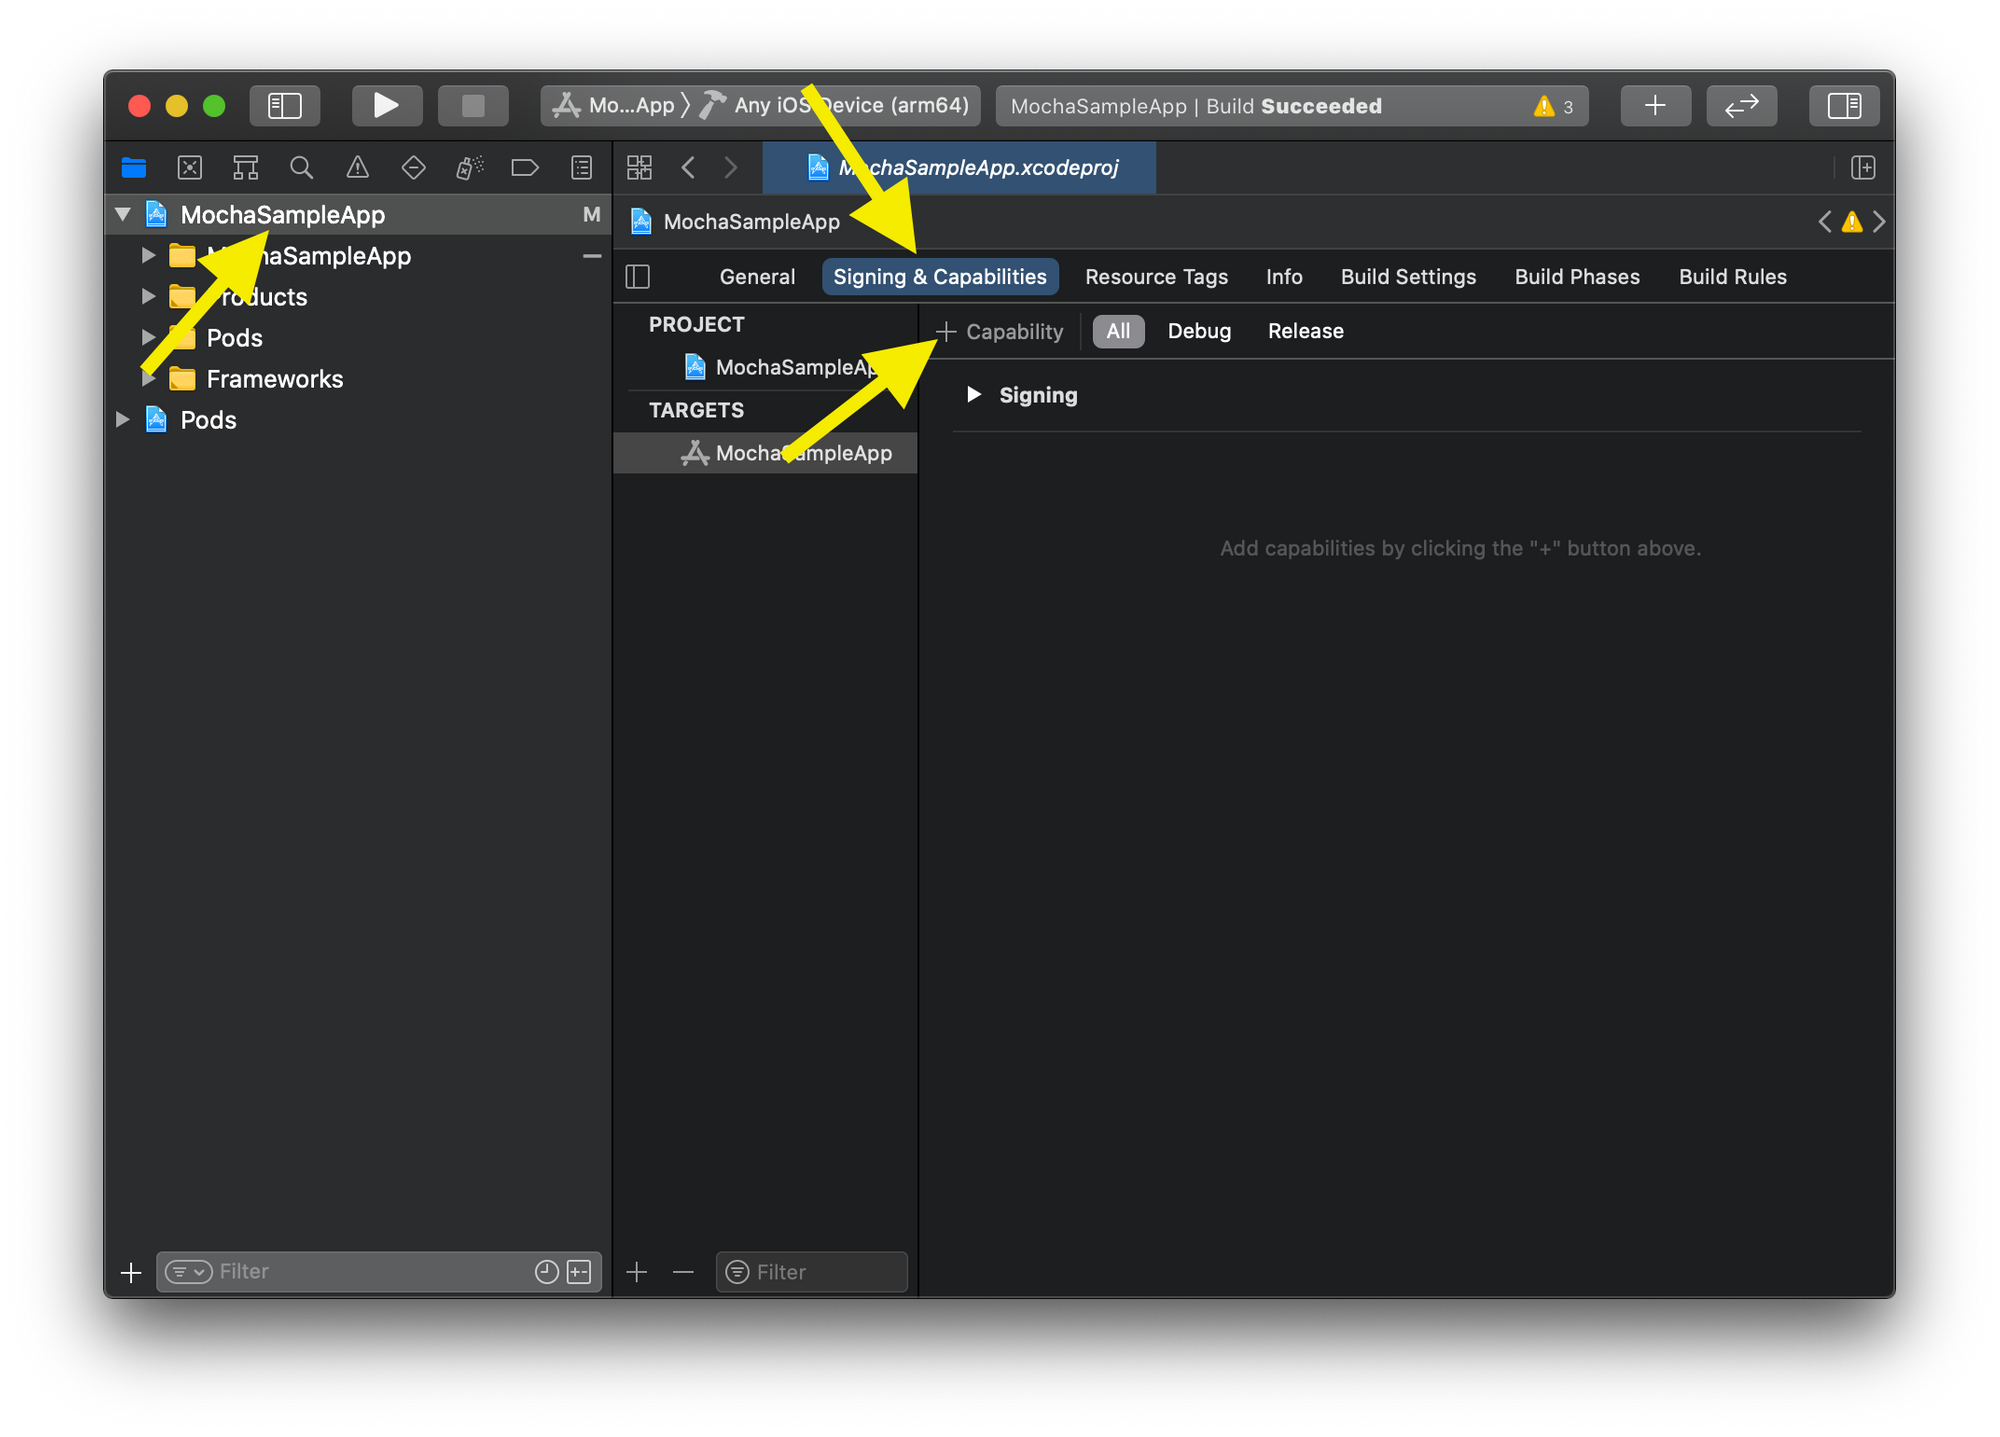
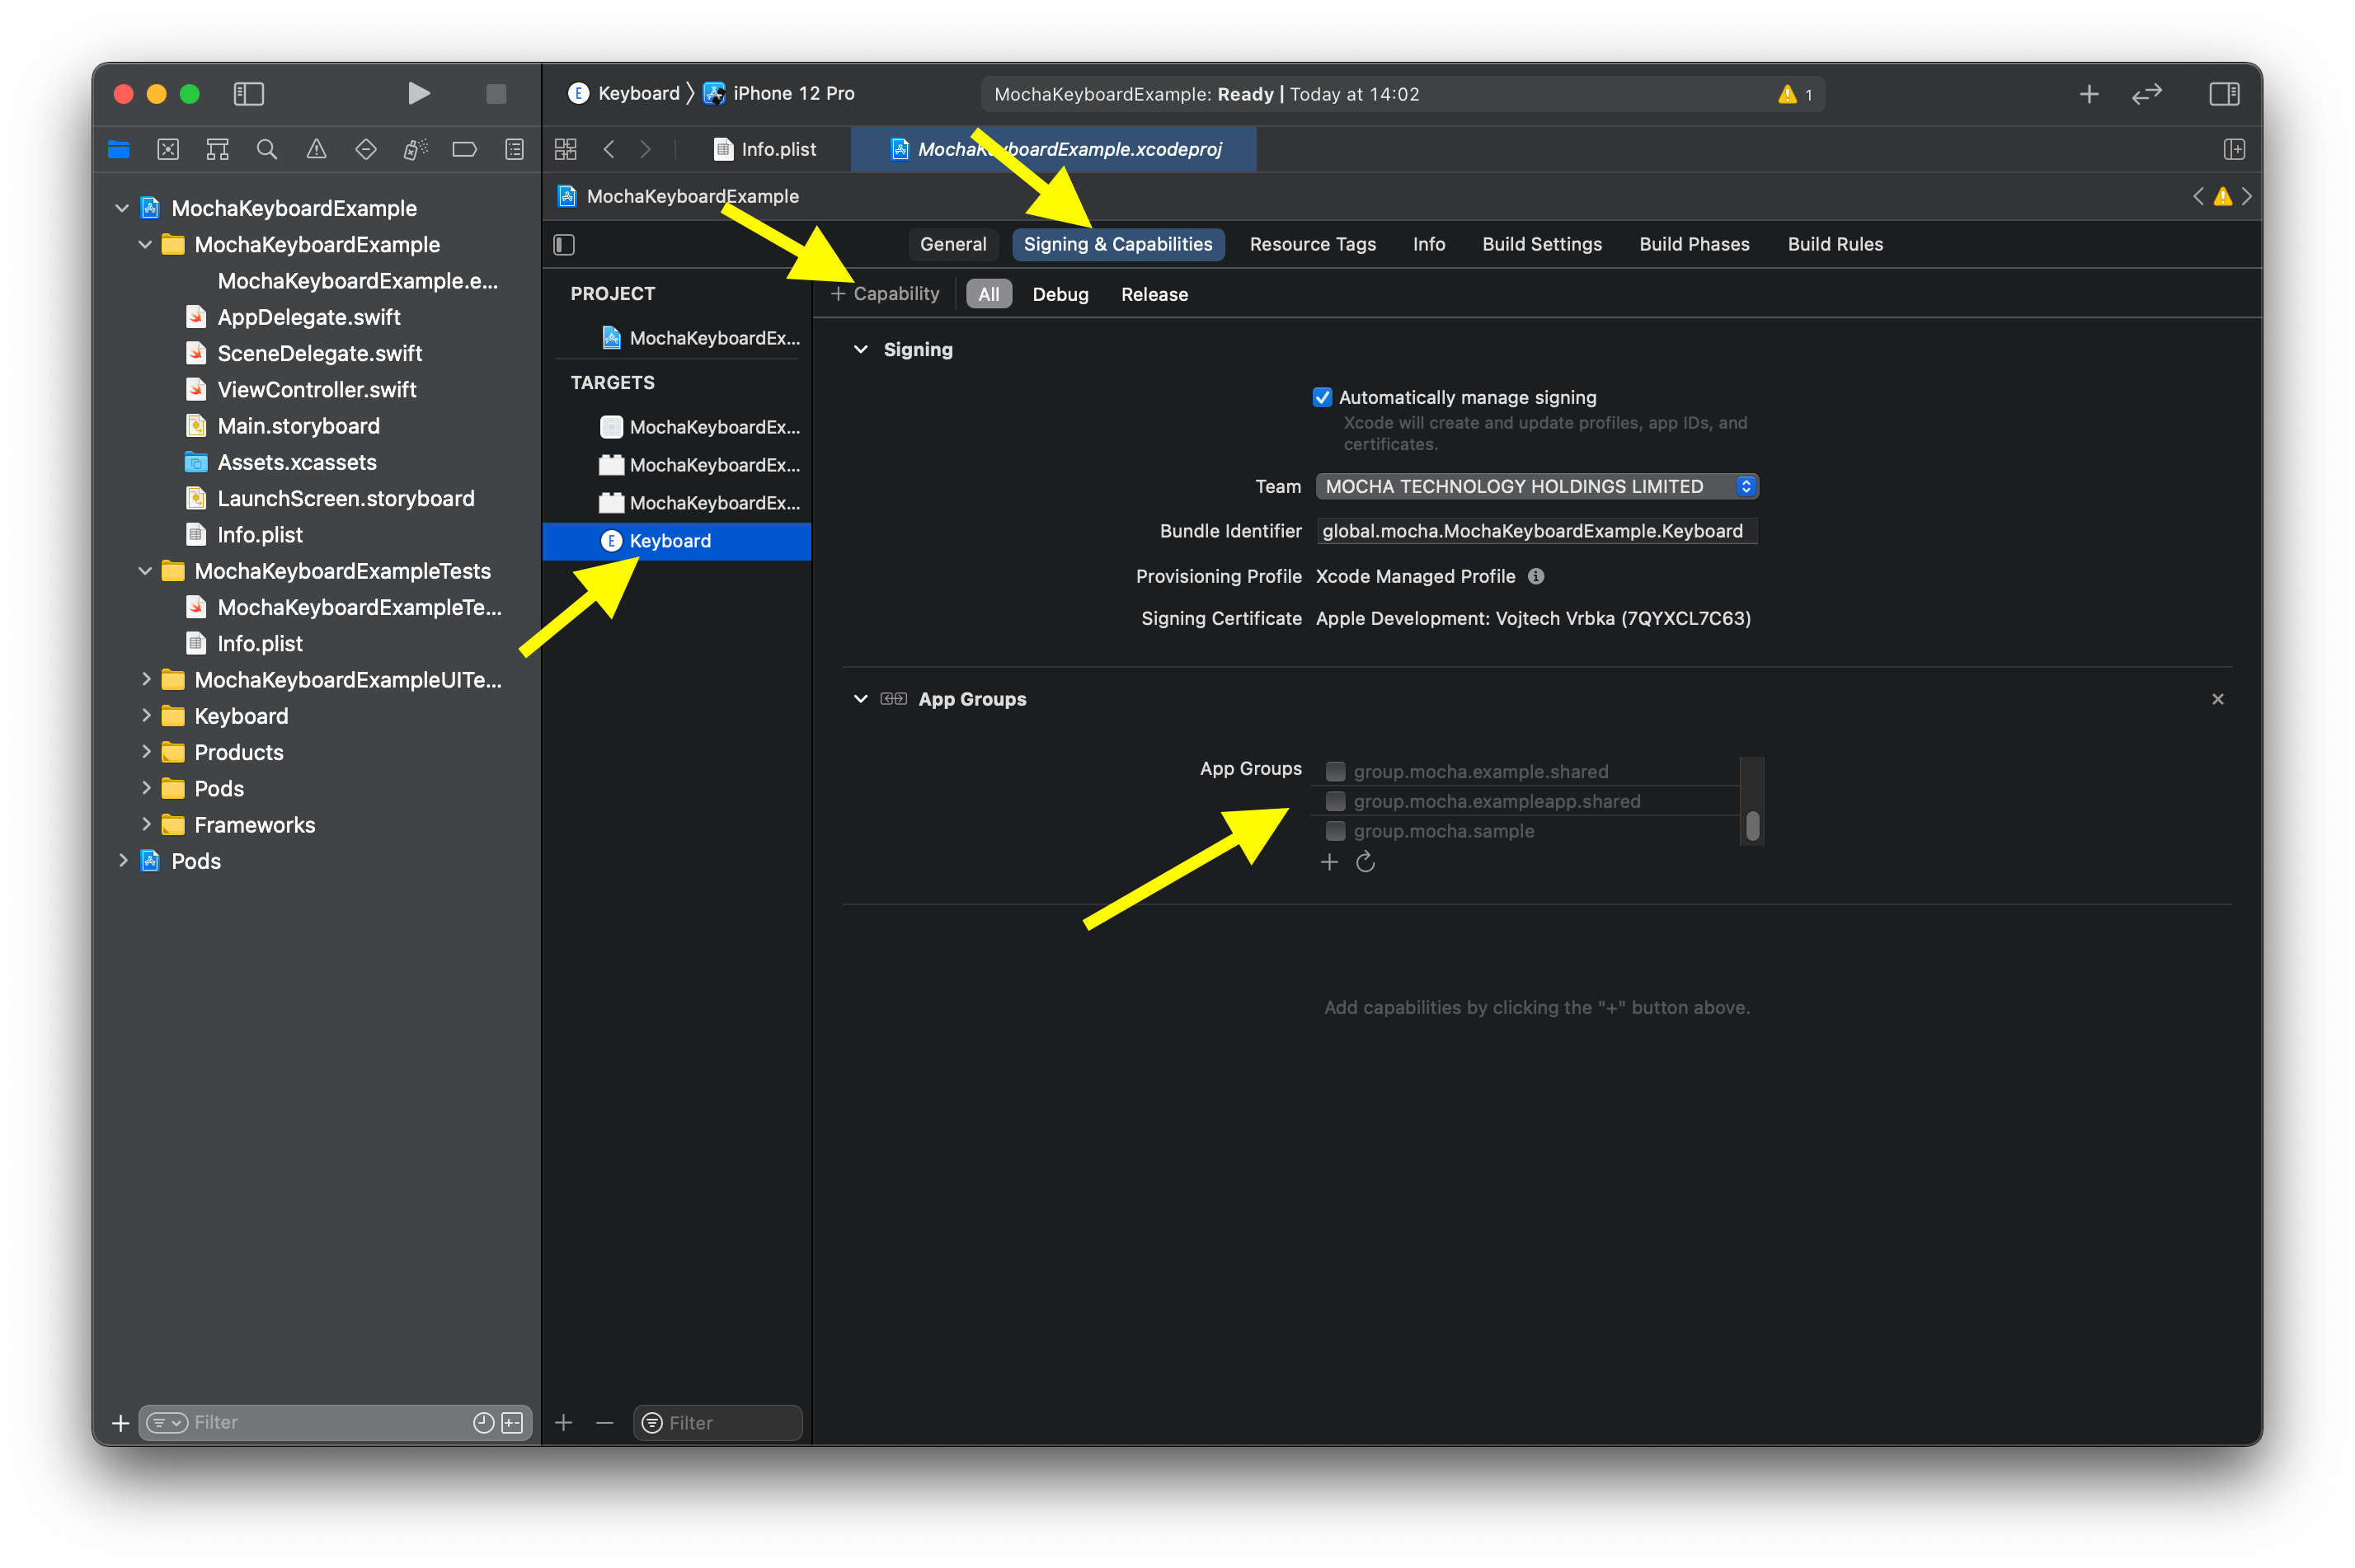
2. Setting App Group Identifier
When integrating the SDK into your iOS application, it's crucial to correctly configure the Xcode project to ensure seamless operation between the main app and the custom keyboard extension. Follow these steps carefully:
- Setting Bundle Identifiers
Your project will contain two targets: one for the main app and another for the custom keyboard extension. It's essential to configure their bundle identifiers correctly:
Main App Bundle Identifier: The bundle identifier for the main app should follow the standard format com.companyname.appname. Replace com.companyname and appname with your company's name and your app's name, respectively.
Keyboard Extension Bundle Identifier: The bundle identifier for the custom keyboard extension should be an extension of the main app's bundle identifier, formatted as com.companyname.appname.extension. This indicates that the keyboard is an extension of the main app.
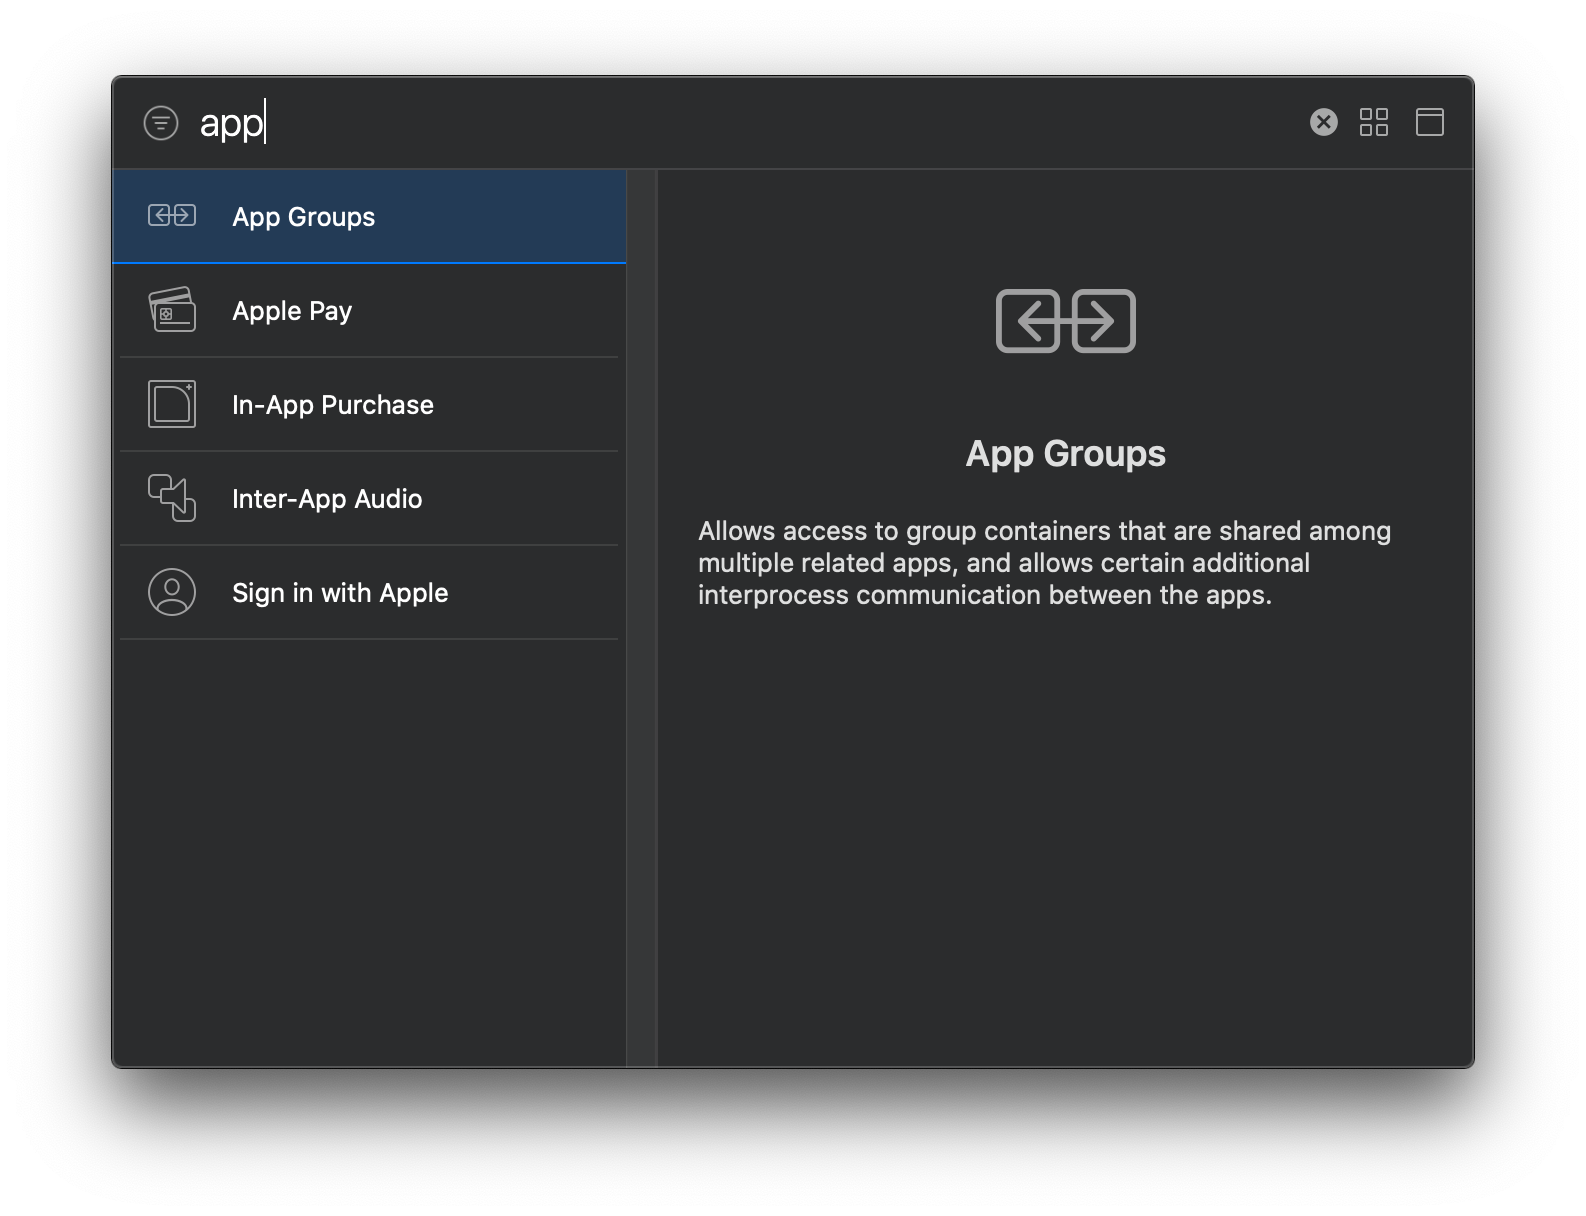
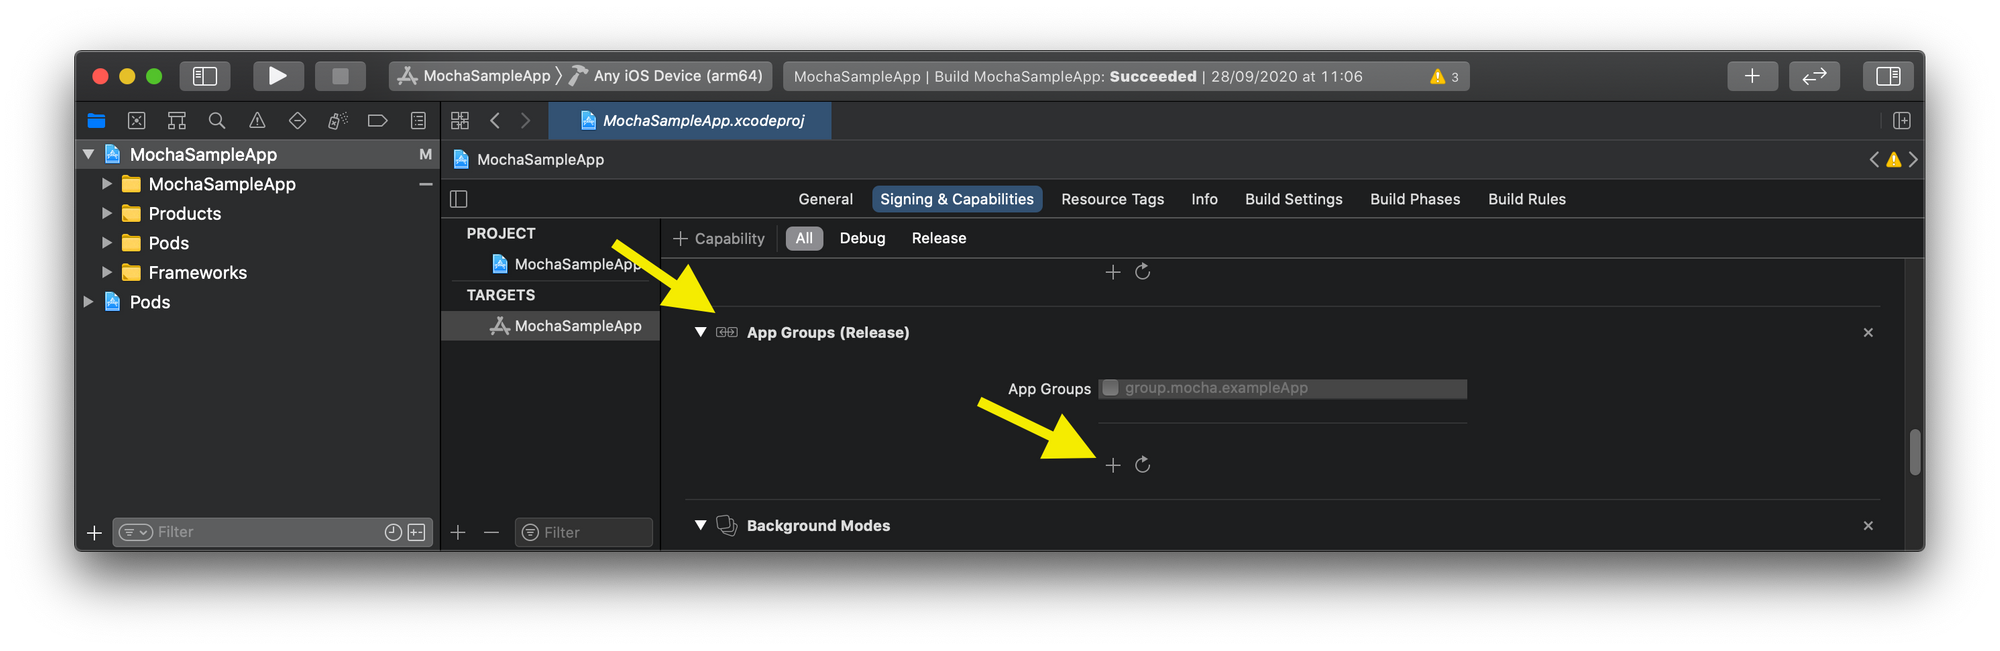
- Configuring App Groups
App Groups facilitate the sharing of data between the main app and the keyboard extension. To set this up:
- Add the App Groups capability to both the main app and the keyboard extension targets in Xcode.
- Create a new App Group with the identifier group.com.companyname.appname. Ensure this App Group is selected for both targets.
This shared App Group identifier allows both the main application and the keyboard extension to access shared data securely.
- KBConfig.json Configuration
The SDK relies on a configuration file named KBConfig.json to function correctly. Within this file, the package_name key must be set to the main app's bundle identifier:
{
  "package_name": "com.companyname.appname"
}
Note: For the app group entitlements we need to be granted access to the app’s record on the Dev Center because the app group has to be synced to the app id. If we do this via Xcode, it will automatically create and assign the App Group on the Developer Center. Verify, just in case it didn't, and if so, create it manually.
3. Add the keyboard SDK
Step 3.0: Add the following SPM package to your app: Tappa KeyboardSDK and link as Frameworks and Libraries to both the app target and the keyboard target.

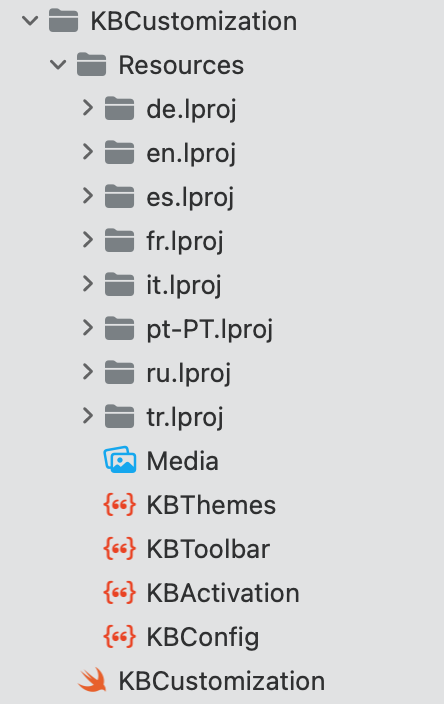
Step 3.1: Create your own customization module. (Ex: KBCustomization) For a guide on how to obtain a customisation module, please read the Customisation section.
Add the files as source files (or you can package them if you prefer) to both the app target and the keyboard target.
Step 3.2 Setup the Keyboard:
- Replace the contents of KeyboardViewController.swift with the contents of the Tappa example entry point controller.
/// This is the entry view controller to the keyboard
/// this file can be copied as such by any client, the only thing
/// that would change is the name of the class (ex:KeyboardVC)

import UIKit
import Keemoji

class KeyboardViewController: UIInputViewController {
    let keyboardExtensionSDK = KeyboardExtensionSDK()

    override func viewDidLoad() {
      super.viewDidLoad()

      /// Any client integrating the SDK, would have to initialize the customization module
      /// prior to first use
      KeyboardExtensionSDK.setup(customizable: KBCustomization())
      keyboardExtensionSDK.inputViewController = self
    }

    override func viewWillAppear(_ animated: Bool) {
      super.viewWillAppear(animated)
      /// Any client integrating the SDK, would have to
      /// call the extension implementation from the SDK
      keyboardExtensionSDK.controllerViewWillAppear(animated)
    }

    override func viewDidAppear(_ animated: Bool) {
      super.viewDidAppear(animated)
      /// Any client integrating the SDK, would have to
      /// call the extension implementation from the SDK
      keyboardExtensionSDK.controllerViewDidAppear(animated)
    }

    override func viewWillDisappear(_ animated: Bool) {
      super.viewWillDisappear(animated)
      /// Any client integrating the SDK, would have to
      /// call the extension implementation from the SDK
      keyboardExtensionSDK.controllerViewWillDisappear(animated)
    }

    override func viewDidDisappear(_ animated: Bool) {
      super.viewDidDisappear(animated)
      /// Any client integrating the SDK, would have to
      /// call the extension implementation from the SDK
      keyboardExtensionSDK.controllerViewDidDisappear(animated)
    }

    override func viewWillLayoutSubviews() {
      super.viewWillLayoutSubviews()
      /// Any client integrating the SDK, would have to
      /// call the extension implementation from the SDK
      keyboardExtensionSDK.controllerViewWillLayoutSubviews()
    }

    override func viewWillTransition(
      to size: CGSize,
      with coordinator: UIViewControllerTransitionCoordinator
    ) {
      super.viewWillTransition(to: size, with: coordinator)
      /// Any client integrating the SDK, would have to
      /// call the extension implementation from the SDK
      keyboardExtensionSDK.controllerViewWillTransition(to: size, with: coordinator)
    }

    override func textDidChange(_ textInput: UITextInput?) {
      /// Any client integrating the SDK, would have to
      /// call the extension implementation from the SDK
      keyboardExtensionSDK.controllerTextDidChange(textInput)
    }

  }
You can also customise the name of this controller (ex: KeyboardVC) but pay attention to sync it to the value of NSExtensionPrincipalClass In Info.plist:
<key>NSExtensionPrincipalClass</key>
<string>$(PRODUCT_MODULE_NAME).KeyboardVC</string>
- Optional, but strongly recommended: To have a unified display of the keyboard name in the selection list of keyboards, it is recommended that the customer sets the value of CFBundleDisplayName for the keyboard to the same name as the CFBundleDisplayName of the app. This can be done in the Info.plist file or in the Build Settings. In that case the operating system does not use the <keyboard_name> - <app_name> convention, but the <display_name> convention. Ex: “Keemoji”
Step 3.3: KBCustomization.swift
In KBCustomization folder also create KBCustomization.swift with the following content:
import UIKit
import Keemoji

/// KBCustomization implementation of the KMCustomizable protocol
/// Any client integrating the SDK, would have to provide a similar implementation of this protocol
/// it is the main custom module containing the other customization objects
public struct KBCustomization: KeemojiCustomizable {
    /// computed property for Configurator protocol implementation
    public var localizer: KeemojiLocalizer

        /// computed property for ImageProvider protocol implementation
        public var imageProvider: KeemojiImageProvider

        /// computed property for ColorPalette protocol implementation
        public var colorPalette: KeemojiColorPalette

        /// Initializes the KBCustomization() module, to be passed by injection
        /// the properties are initialized with the module's implementations for
        /// the respective protocols
        public init() {
            localizer = KMLocalizer()
            imageProvider = KMImageProvider()
            colorPalette = KMColorPalette()
        }

    }

    public struct KMImageProvider: KeemojiImageProvider {
        /// Retrieves an image asset for a given `name`, if an image exists
        /// To be used for app and keyboard assets
        /// ```
        /// image(named: "flag")
        /// ```
        ///
        /// - Parameter name: the name of the image asset
        ///
        /// - Returns: image asset for a given `name`, if an image exists;
        /// nil if no image exists with that name.
        public func image(named name: String) -> UIImage? {
            UIImage(named: name,
                    in: .main,
                    compatibleWith: nil)
        }

        /// Retrieves an icon asset for a given `name`, if an icon exists
        /// To be used in the context of the toolbar (for iconresources)
        /// ```
        /// icon(named: "flag")
        /// ```
        ///
        /// - Parameter name: the name of the icon asset
        ///
        /// - Returns: icon asset for a given `name`, if an icon exists;
        /// nil if no icon exists with that name.
        public func icon(named name: String) -> UIImage? {
            UIImage(named: name,
                    in: .main,
                    compatibleWith: nil)
        }
    }

    public struct KMColorPalette: KeemojiColorPalette {
      /// computed property for status bar background
      /// in case client has forced per-app appearance
      ///
      /// - Returns: The keyboard text color
      public var activation_status_bg: UIColor { .black }

        public init() {}

    }

    public struct KMLocalizer: KeemojiLocalizer {
        /// Produces the translation for the given `text` into the desired language.
        ///
        /// ```
        /// translation("Download") // "Descargar"
        /// ```
        ///
        ///
        /// - Parameter text: The text to be translated.
        ///
        /// - Returns: translation for the given `text` into the desired language.
        public func translation(_ text: String) -> String {
            NSLocalizedString(text, comment: "")
        }

        public init() {}

    }
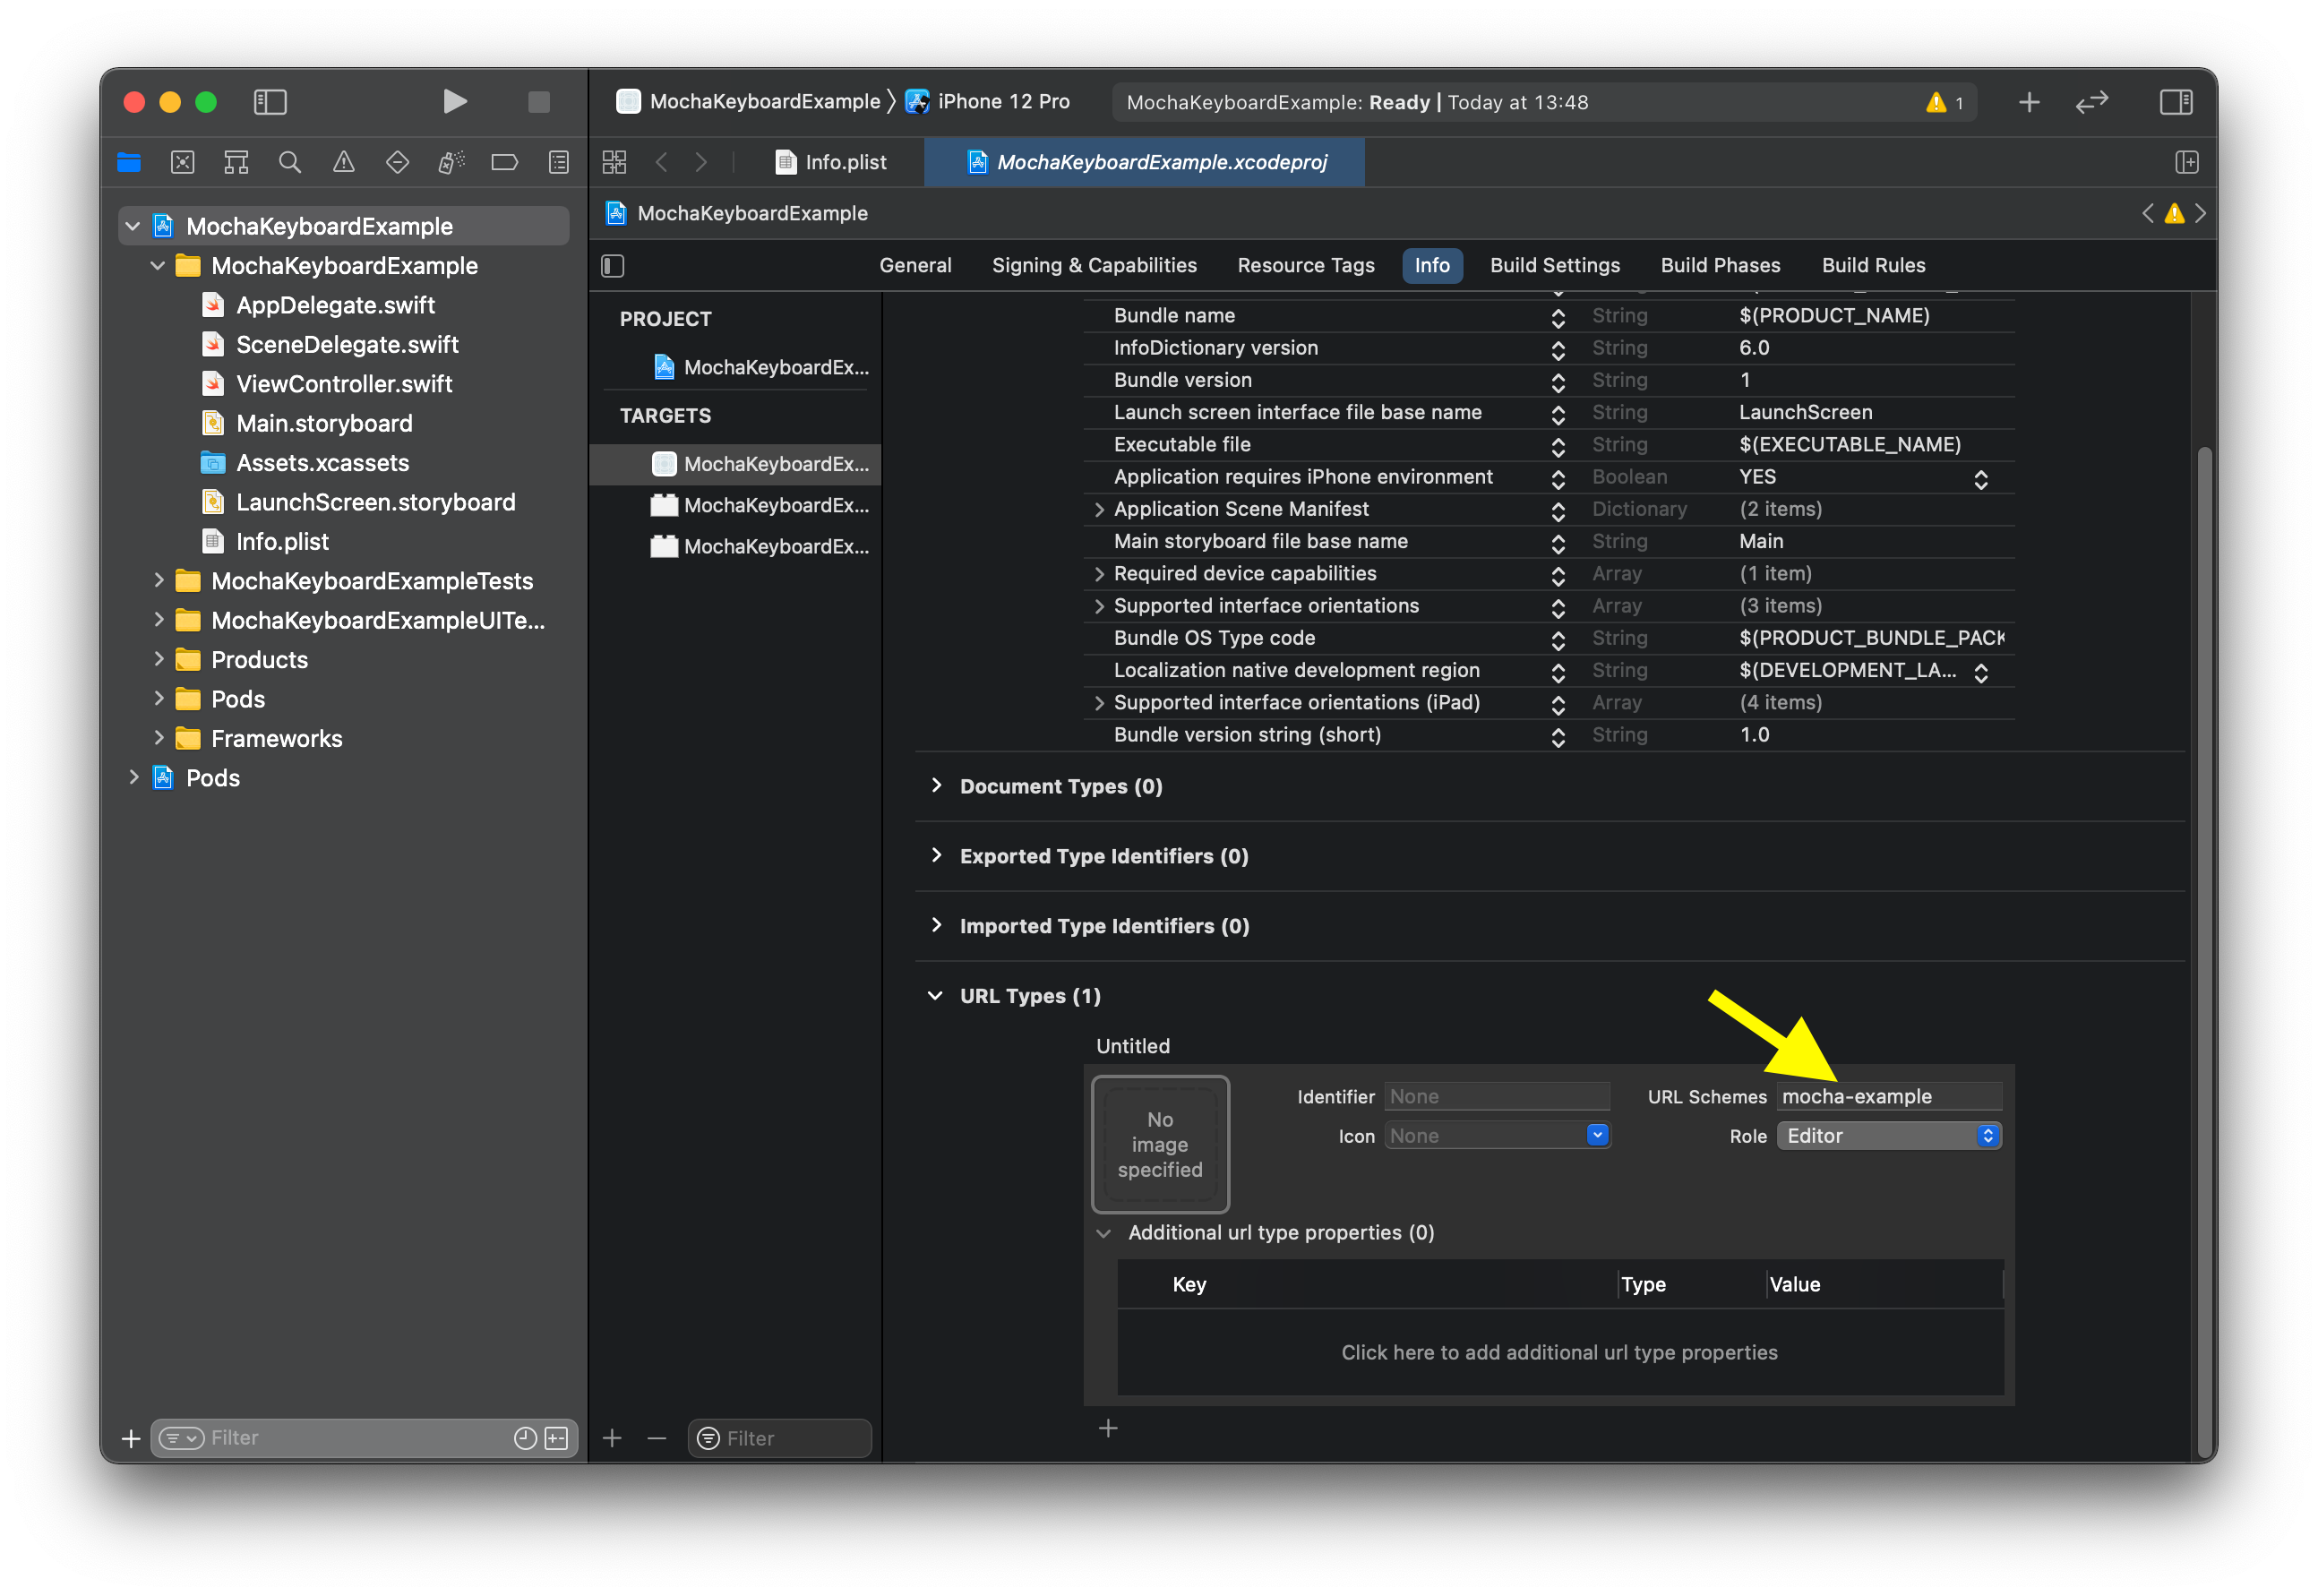
Step 3.4: Deep linking
Add a URL Type with the name taken from custom Config key url_scheme to the URL types of the app.
Note: For the deep-links to work, they need to be implemented on the app client side.

Step 3.4: The keyboard activation can be done in two ways:
Either manually, by going to Settings and activating the keyboard or
By running the onboarding steps from the app (in that case it needs to be done after step 4).
Checkpoint: Verify that the keyboard is working properly
4. Hook the Onboarding to the app
Step 4.0: Call the method channel functions in the Flutter app flow.
static const platform = MethodChannel('mocha.channel.shared.data');
...
isKeyboardInstalled() async {
    bool result = await platform.invokeMethod("isKeyboardInstalled");
    setState(() {
      isKeyboardInstalledStatus = result;
    });
 }

launchActivationIfNeeded() async {
    await platform.invokeMethod("launchActivationIfNeeded");
}
Step 4.1: Initialize SDK at the earliest point possible in the flow. (Ex: AppDelegate.swift)
Step 4.2: Open up method channel and set methods dispatcher. It will dispatch the Flutter calls to SDK public functions.
import Flutter
import Keemoji
...
@UIApplicationMain
@objc class AppDelegate: FlutterAppDelegate {
...
    func application(
        _: UIApplication,
        didFinishLaunchingWithOptions launchOptions: [UIApplication.LaunchOptionsKey: Any]?) -> Bool
    {

			initKeyboard()

        let controller : FlutterViewController = window?.rootViewController as! FlutterViewController
        let methodChannel = FlutterMethodChannel(name: "mocha.channel.shared.data",
                                                binaryMessenger: controller.binaryMessenger)
        methodChannel.setMethodCallHandler({
            [weak self] (call: FlutterMethodCall, result: FlutterResult) -> Void in
            // This method is invoked on the UI thread.
            if call.method == "isKeyboardInstalled" {
                self?.isKeyboardInstalled(result: result)
            } else if call.method == "isKeyboardAdded" {
                self?.isKeyboardAdded(result: result)
            } else if call.method == "launchActivationIfNeeded" {
                self?.launchActivationIfNeeded(result: result)
            } else {
                result(FlutterMethodNotImplemented)
                return
            }
        })
// ...

	  }

	  private func initKeyboard() {
        observeOnboardingStatus()
        KeyboardSDK.setup(customizable: KBCustomization())
        KeyboardSDK.initialize()
    }

/// Any client integrating the SDK would have to subscribe to the SDK isOnboardingFinished publisher
    /// and go to the next step of the app flow (after finishing onboarding)
    private func observeOnboardingStatus() {
        KeyboardSDK.onboardingStatus.$isOnboardingFinished
            .receive(on: DispatchQueue.main)
            .sink { finished in
                // do something
            }
            .store(in: &cancellables)
	   // optional, if Onboarding can be cancelled (flag is true)
        KeyboardSDK.onboardingStatus.$isOnboardingDismissed
            .receive(on: DispatchQueue.main)
            .sink { dismissed in
                // do something
            }
            .store(in: &cancellables)
    }
Step 4.3: Implement the native methods that are called by the method channel handler by calling SDK public functions.
	  private func launchActivationIfNeeded(result: FlutterResult) {
        startOnboarding()
    }

    private func startOnboarding() {
        if rootController == nil {
          rootController = UIApplication.shared.windows[0].rootViewController
        }
        KeyboardSDK.startOnboarding()
    }
Step 4.4: Implement the deep links behaviour in the iOS app (AppDelegate.swift openURL)
    override func application(_ app: UIApplication,
                 open url: URL,
                 options: [UIApplication.OpenURLOptionsKey : Any] = [:]
    ) -> Bool {
        // needed at least for the SDK launch Settings feature,
        // other deep links behaviour needs to be implemented in the app
        if url.absoluteString.contains("title=launchSettings") {
            return KeyboardSDK.application(open: url, options: options)
        }
        return super.application(app, open: url, options: options)
    }
Checkpoint: Verify that everything is working (including Onboarding)
Updated 2 months ago